This is an old revision of the document!
Draw UserTexts - User Manual
Introduction
Draw UserTexts is a plugin for Rhino 3D, designed to add the possibility to automatically insert texts based on the curves usertexts in your Rhino document.
Plugin installation
Overview
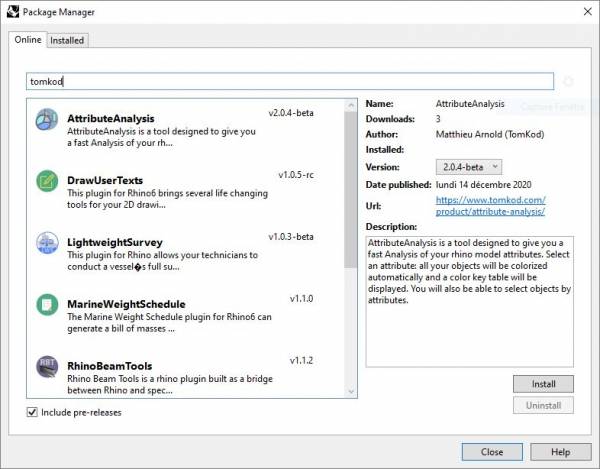
The plugin installer can be downloaded at: https://www.tomkod.com/product/draw-usertexts/
A free trial is included, and yearly licenses can be purchased on the aforementioned page.
Draw UserTexts works for Rhino 61) and Rhino72).
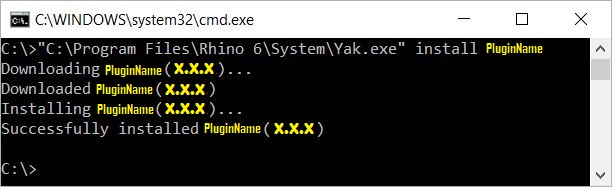
Yak
Our plugins are also compatible with Yak, Rhino's new package manager 3), which is basically an application store for Rhino. You just need to call Rhino's command _PackageManager:
You can also install from the repository with the following command line:
"D:\Program Files\Rhino 6\System\Yak.exe" install 'PluginName'
If you add this in a batch file (*.bat) at windows startup, it is probably the best way to keep all your plugins up-to-date ![]()
License activation
Prerequisites
The free evaluation can be used once per computer, and requires network access to www.license.tomkod.com
The license activation requires network access to www.tomkod.com
Please check your firewall in case of failure.
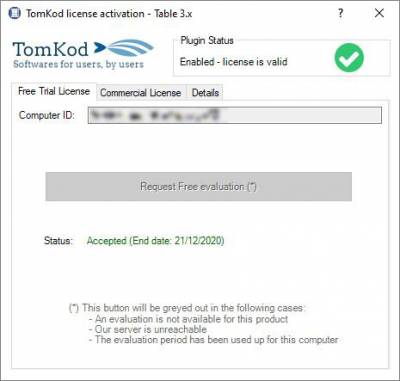
Activation form
The activation window automatically shows up when the plugin is loading and a valid license or trial is not registered.
If you want to see, change or remove your license while the plugin is already loaded, you can use the Rhino commands PluginName_License.
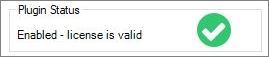
Activation status is always visible on the upper right corner of the form, if the icon is green your plugin will be enabled:
Trial Tab
This first tab is dedicated to the trial requests. Your trial status is displayed, and the button is disabled if a trial is not available for your computer (Your trial has already been activated, or the server is unreachable)
Commercial Tab
This tab's two main buttons let you Check-out (Activate) or Check-in (Desactivate) your license from our license server.
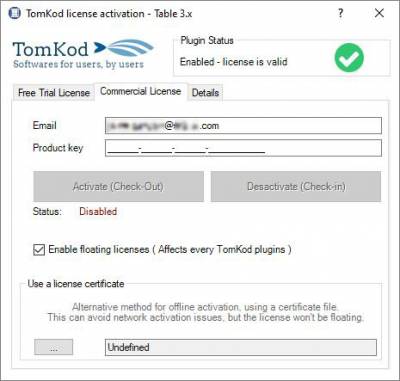 When the checkbox “Enable floating licenses” is checked, every TomKod's plugin will try to deactivate the license automatically when closing (Making it available for another of your computers)
Finally, a license certificate (*.TkLic) can be selected at the bottom of this tab. It allows to activate a license offline, but the license won't be floating anymore. If you need one, contact us at https://www.tomkod.com/contact/
Toolbar
The toolbars for Rhino are always included in your plugins installation directory, or can be downloaded here.
You just have to drag/drop the file “Tomkod.rui” to a rhino window to install them.
Features and commands
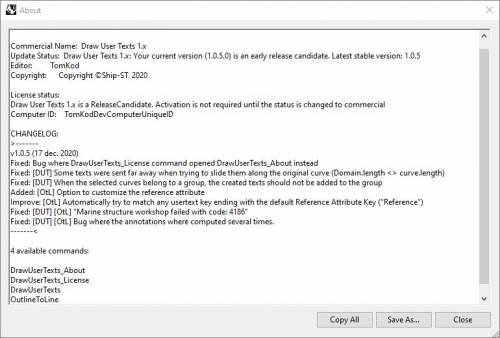
DrawUserTexts_About
This command can be used only from the command line prompt. It displays the plugin's current revision and license status.
DrawUserTexts_License
This command can be used only from the command line prompt. It displays the plugin's activation form.
See license_activation.
DrawUserTexts
Adds annotations along your 2D curves using our smart positioning system. If the curve is too short or there isn't enough space, a leader will be used instead.
Walkthrough
- Launch the command
- Select the target curves ⇒ a real-time preview is displayed
- Change any option if needed
- Right-click or press ENTER to validate
Add image gif
Scripted mode
No scripted mode available for options at the moment.
Options
Attribute
This option opens a form to pick the usertext that should be read, among a list of attributes existing in the model.
The Rhino's properties #ObjectName and #ObjectLayerName will also be available.
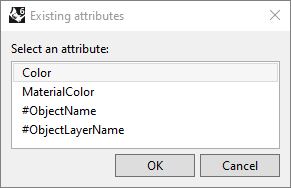
If some curves don't have the selected usertext, the preview will display <?> instead, but thoses texts won't be created in the result.

TextHeight
Changes the inserted texts size.

If your text height i too big compared you the size of your curves, it might considerably slow down the command preview, especially on large models. This is normal, since our algorithms will have to try a lot more locations to fit the texts.
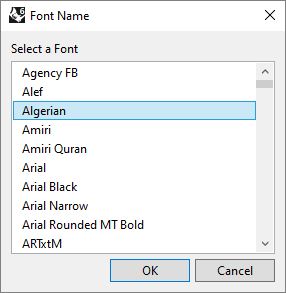
Font
This option opens a form to pick the font name among your computer's installed fonts.
It might happen that the preview is not refreshed after a font is selected. This can be fixed by changing the text height afterward.
UseCurveLayer
If UseCurveLayer=Yes, the generated texts will be in the same layers as their parent curves.
Layer
This option opens a form to pick the output texts' layer.
Only visible if UseCurveLayer=No.

OutlineToLine
Convert (metal sheets) outlines to single lines or arrows.
Walkthrough
Inputs
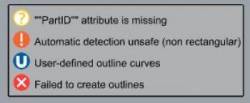
One or several outline curves(Usually a planar section). The selected curves will be automatically grouped using the user text “PartID”. Conversely, when a curve is picked, the whole group will be selected.
Result
For each curves group, the main curve is kept and outlines or arrow are created. If the option is enabled, annotations will be also created.
The result is previewed in real time while using the command, as well as a key table to understand the preview's icons.
Options
| Type | Choose between Outline, Arrow or Auto. When Auto is selected, the user text “RhinoStructure:Type” will be read for each group. The result will be an arrow if the value is 'ARROW', else it will be an outline |
|---|---|
| Layer | Select a layer for the result |
| ChangeSide | Swap a group's offset or arrows orientation.  |
| ChangeAllSides | Applies ChangeSide to every groups |
| ManualCurvesPick | Pick a group from your current selection, then select/deselect the curves that should be kept. Useful when automatic detection got it wrong |
| LengthBetweenOffsets | Distance beetween two offset curves when the Outline mode is used |
| Offset | Offset distance from the group's main curve |
| LengthOffset | Length of every offset curve |
| AngleArrow | Angle when arrow mode is used |
| LengthArrow | Length of every arrowheads curves |
| AddReference | When enabled, applies a specialized version of WS2S_AddRef command to your result |
| TextHeight | Text height used when AddReference is enabled |